Routes

You use routes to plan a trip. Navigation guides you to a specific node with the ability to advance to a successive node when you reach a target.
When you start navigating, GPS Essentials will guide you to a target node. The target node is required to have a valid location. Apart from this, the target node can be any node, such as a waypoint, a picture or a track point.
📱 Start routing
- Tap and hold a node in stream view.
- Select the navigate button from the toolbar.
The nodes in the same category as the target node are the current route. You can switch manually between those nodes or configure auto skip to advance to the next node automatically.
You can add the route card to the route to enable route controls.
📱 Add the route card
- Open the stream and select the route category
- Tap on the plus button and open the Cards tab
- Tap on Route
The Route Card
The route card shows the waypoint you are navigating to on this route, or none, and controls navigation:
- Reverse reverses the order of all waypoints in this route.
- Recreate recreates this route on the Directions tab of Add Elements.
- Start starts navigation on this route. If you are already somewhere along the route, GPS Essentials looks for the nearest leg and makes the waypoint ahead of you the target.
- While you navigate, Back and Next make the previous or the next waypoint the target. They also show while you navigate another route, and then change that route's target.
- Stop stops navigation. It replaces Start while you navigate this route.
Start first asks for permission to use your location if GPS Essentials does not have it: navigation cannot start without it. It then asks for location all the time. Navigation starts either way, but without that permission it cannot continue once Android has closed GPS Essentials in the background; Start is shown in red while it is missing.
There are other options to control navigation: You can add the Route Control widget to the dashboard to advance the target node from the dashboard. The Navigate group in the dial menu of Portable Maps, the Routing notification and scripts can control navigation, too.
While You Navigate
When you start navigating, a service runs in the background to track route parameters, such as your current distance, and to control voice output.
- A Routing notification shows the current target. Tap it to open the route. Its Stop, Back and Next buttons work like the buttons on the card.
- When the target changes, GPS Essentials shows the distance to the new target and its name, for example “In 300 m: Harbor”.
- When you come closer to the target than the Announcement Proximity in Settings, the target is announced again. At the last waypoint of the route, its name is announced. Speak Route Info in Settings speaks the announcements aloud, and Proximity Alert plays a sound and shows an alert with the target; tap Silence to close it.
💡 Navigation continues in the background when you switch off the screen or start another app. This will also cause the GPS receiver to stay on and drain your battery. Stop navigation when you no longer need it.
Starting and stopping navigation is noted in the Messages inbox as Navigation started and Navigation stopped, with a link to the route. Navigation can also stop without you asking: when the battery is low, when Android does not allow GPS Essentials to keep running in the background, when the permission to use your location is missing, or when the target no longer exists. You then get a Navigation stopped notification that gives the reason and, when navigation can continue, a Resume button, an unread message in the Messages inbox, and a short notice on the screen if GPS Essentials is open.
Auto Skip
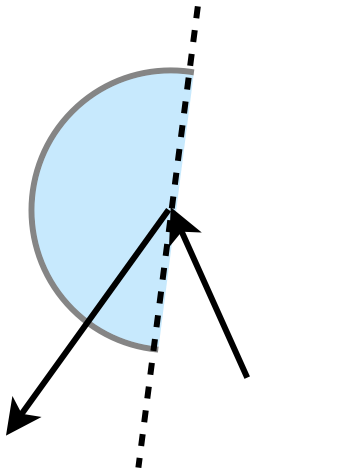
GPS Essentials can advance to the next node in your current route automatically. This ability is called auto skip. It is on unless you turn off Auto Skip Target under Routes in Settings.
Auto skip will only happen when you are closer than the auto skip distance away from the target point. You can set this distance in Settings under Auto Skip Distance. Additionally, you have to cross the bisecting line between your current leg and the subsequent leg of the route. The drawing above illustrates the algorithm: Auto skip will occur as soon as you are within the blue area.

When the first route point is active, auto skip will occur when you have passed a line perpendicular to the first leg, as the drawing above shows.
Auto skip does not happen when you navigate along a track.
Straight Line Routes
Creates a route between two or more waypoints. The legs between the waypoints will be straight lines. You find it on the Straight Line tab of Add Elements, both in a stream and in the stream list.
📱 Enter waypoints to a create route dialog
The waypoint list starts with your current location.
- Select waypoints by tapping and holding in a stream list, then tap the plus button. The waypoint list will be populated with the waypoints that you selected.
- Or mark waypoints in any stream (see Mark/Copy/Move in the Streams chapter), then open the Straight Line tab and tap the button that adds the marked elements.
- Or open the Straight Line tab and tap the button that adds a point. Then pick a stream and a waypoint from it.
The cross icon next to each waypoint removes it from the list.
To change the order of the waypoints, tap and hold a waypoint and drag it to the new position.
📱 Create a route
- Tap on Create to create and open the route.
- Or tap on Start to create the route and immediately start navigating.
Directions
The Directions tab lets you create routes along roads with turn instructions. You need a network connection to use it, but once GPS Essentials has created the route, you can navigate without one.
The waypoints list can be populated in the same way as described under Straight Line Routes above. Choose the Route Type (Driving, Walking, Bicycling or Transit) and what to avoid.