Streams

Lists all your streams, lets you filter streams by type and edit streams.
Streams are a core concept of GPS Essentials. A stream is a series of locations (waypoints, pictures, messages) that are structured in categories. Feel free to read the Domain Model chapter to learn more about streams.
When you tap on Streams, you see a list of all streams. The Tracks and Routes buttons on the start screen open the same list with a filter.
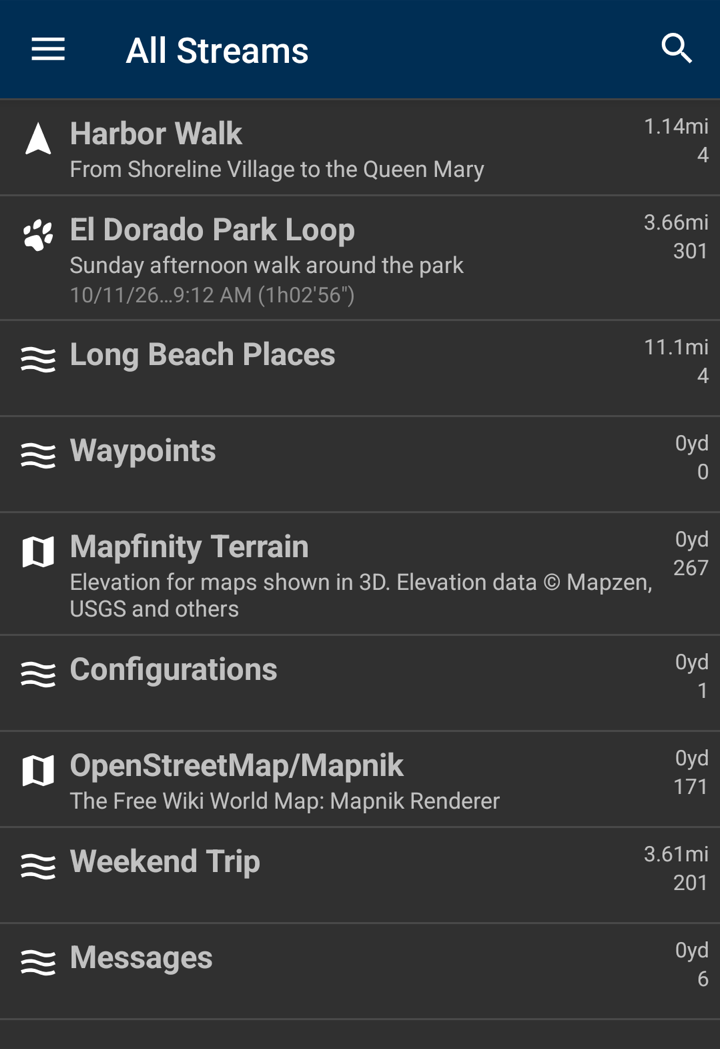
The navigation drawer changes the filter. Every filter limits the streams in the list based on a specific criteria. The following filters are defined:
| Filter | Description |
|---|---|
| All Streams | Shows an unfiltered list of all streams on the device |
| All Tracks | Shows all streams with stream type “Track” or “Mixed”. While a track is recording, it is shown on top under Recording Track. |
| All Routes | Shows all streams with stream type “Route” or “Mixed”. While you navigate a route, it is shown on top under Running Route. |
| All Maps | Shows all streams with stream type “Map” |
| Starred Streams | Shows all streams that are starred. The contents of starred streams are shown on all maps. |
Review stream types in the Domain Model chapter for an explanation of stream types.
Notice that the filters are overlapping, some stream may appear under multiple filters.
The search button finds streams by name or description. The plus button creates a new stream: an empty one, a track, an import or a route (see Add Elements below).
Selecting Streams
Tap and hold a stream to select it. While you are selecting, tap more streams to add them to the selection or remove them from it.
With one stream selected you can choose Properties to rename the stream or to star it (tap its icon in the dialog; a starred stream has a yellow icon), Resume to continue recording a track into it, Show on Map to see it on a map, and Duplicate to make a copy of it.
With one or more streams selected you can choose Delete to delete them after you confirm, Export to save them as a file, Share to send them to another app right away, in the format you chose last in Export, and Select to select all streams, the others, or those before, after or between the selected ones. A message in Messages records each deleted stream.
Stream View
Tap on a stream to view this stream. GPS Essentials will open the list view of the stream. The list view shows the nodes of a stream by category. The Waypoints, Messages and dashboard Configurations streams open in the same view.
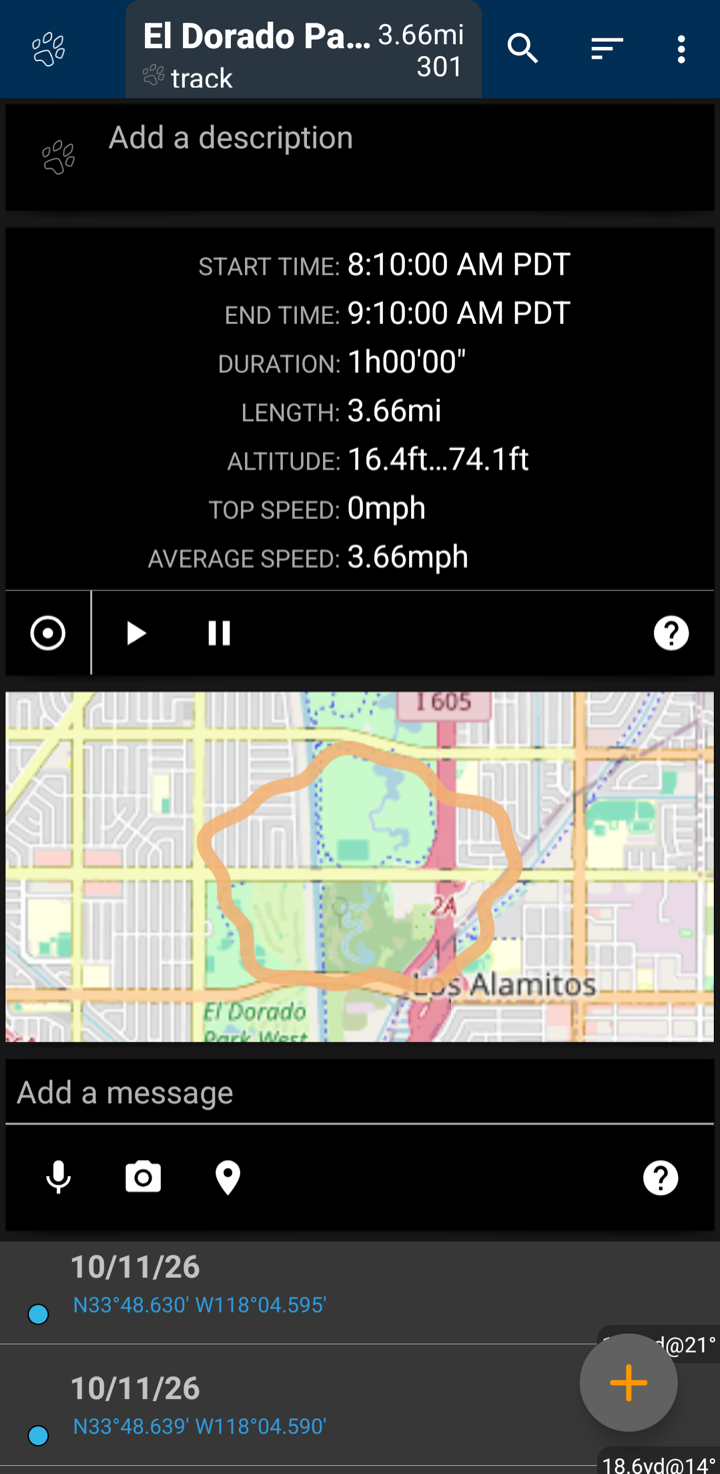
Tap on the category name in the toolbar to change the category. For every category, you will also see the length and number of nodes for this category.
Cards at the top of the list show information and controls for the current category (see Cards below). To remove a card, swipe it to one side.
Tap an element to open it. For example, a waypoint opens in the waypoint editor and a message opens on its own screen. The search button finds text in the elements of the current category.
Sort orders the elements by Natural, Name, Time, Marker or Distance. Descending reverses the order. Natural is the order in which the elements were added, unless you have rearranged them. To rearrange elements, sort by Natural. Then tap and hold an element and drag it to its new position.
Selecting Elements
Tap and hold an element to select it. While you are selecting, tap more elements to add them to the selection or remove them from it. The toolbar then offers:
| Action | Description |
|---|---|
| Delete | Moves the selected elements to the Trash category of the stream. |
| Navigate | Starts navigating to the selected element. Only shown when one element is selected. |
| Select | Selects all elements, the others, or those before, after or between the selected ones. |
| Mark | Remembers the elements so that you can copy or move them elsewhere. For messages, Mark as Read and Mark as Unread change their read state. |
| Export | Saves the selected elements as a file. |
| Fill Elevation | Sets the elevation of the selected elements from the terrain data. It needs a connection where none is cached. |
Menu
- Clear moves the current category with all its elements to the Trash. In the Trash, Clear deletes its contents for good. The top category of a stream cannot be cleared.
- Fill Elevation sets the elevation of all elements in the category from the terrain data.
- View shows the category on a Map, its Pictures, a Chart, or its Style.
- Selection copies or moves the marked elements into the current category.
- Properties changes the name of the stream and whether it is starred.
- Export saves the whole stream as a file.
- Repair checks the stream, restores categories of elements that lost theirs, and recalculates distances and elevation gain.
Creating New Nodes
There are a few ways you can create single new nodes in stream view. If you want to add a single waypoint with name, description, tags and icon from known coordinates, use the Waypoint tab of Add Elements.
📱 Add a new waypoint
- Tap the plus button in the toolbar.
- Open the Waypoint tab.
- GPS will start. The position is your current location and improves while the GPS gets more accurate.
- To enter coordinates yourself, tap the position. To go back to your current location, tap the location button.
- Enter name, description and tags, and choose an icon.
- Tap on Create.
If you frequently add new nodes such as text or pictures, add the Post card to your stream:
📱 Add the post card for text and pictures
Tap the plus button in the toolbar.
Open the Cards tab.
Tap on Post.
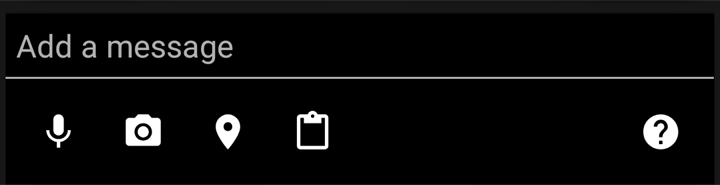
On the Post card, type into the “Add a message” field. As soon as there is text, a send button appears. Tap it to add the text as a message at your current location, or without a location if none is known. The microphone button lets you dictate the text instead; it does not store the recording. The camera button takes a picture and adds it to the stream, and the coordinates button adds a location with known coordinates. When elements are marked, a paste button copies or moves them here.
Mark/Copy/Move
You can mark one or more nodes in a category. Then you can reference these nodes later to create routes or you can copy or move them to another category in the same or in a different stream.
📱 Mark a set of nodes
- Tap and hold on the first node until the toolbar changes.
- The toolbar now shows the number of selected nodes and a set of contextual buttons.
- Tap on more nodes to select or deselect them.
- Tap on Select to select nodes based on their position in the list, such as all, the others, or those between the selected ones.
- Tap on Mark to mark the set of currently selected nodes and close the contextual toolbar.
📱 Copy or move nodes
- Mark the nodes you want to copy or move.
- Open the target stream and select the category.
- Select Selection from the menu, or tap the paste button on the Post card.
- Use Copy or Move.
This is also how you restore elements from the Trash.
Add Elements
When you tap on the plus button in a stream, Add Elements opens. It adds nodes from many sources to the current stream.
💡 The dialog has two incarnations: Add Elements behind the plus button in stream view and Create Stream behind the plus button in the list of streams, which creates a new stream. Some tabs are only available in one of them.
The dialog is divided into tabs. Swipe or tap the tabs to switch between them. The dialog opens on the tab you used last.
| Tab | Description |
|---|---|
| Waypoint | Adds a waypoint to the current category, at your current location or at coordinates you enter. Only in a stream. |
| Cards | Adds a card to the current category. Reset goes back to the default cards. Only in a stream. |
| Category | Adds a Sequence, Route, Track, Polyline or Polygon category below the current category. Only in a stream. |
| Empty | Creates an empty stream with the name you enter. Only in the stream list. |
| Track | Starts recording a track: into the current stream, or into a new track when you come from the stream list. |
| Import | Reads data from files or links and creates nodes and categories from it. |
| Straight Line | Creates a route with straight lines between two or more waypoints. |
| Directions | Creates a route along roads with turn instructions. |
The route tabs are described in the Routes chapter.
Cards
The cards tab lets you add cards to the current category. Cards are shadowed rectangles on top of the node list that show condensed information about the stream or category. Some cards let you interact with the stream in a special way. To remove a card, swipe it to one side.
Your current card configuration is stored in the stream style, so cards will show again when you open the category.
| Card | Description |
|---|---|
| Post | Quickly creates new nodes. |
| Info | Shows and changes the description and the tags of a stream. |
| Route | Lets you start and stop navigation and switch between waypoints. |
| Track | Lets you resume and pause recording and shows condensed information about the track. You can also start playback of the track. During playback, GPS Essentials uses the current track to read locations instead of the GPS unit. |
| Area | Lets you calculate areas. |
| Map | Shows the current stream on a map. |
| Chart | Shows altitude and speed charts. |
| Trash | Clears the trash. |
Charts
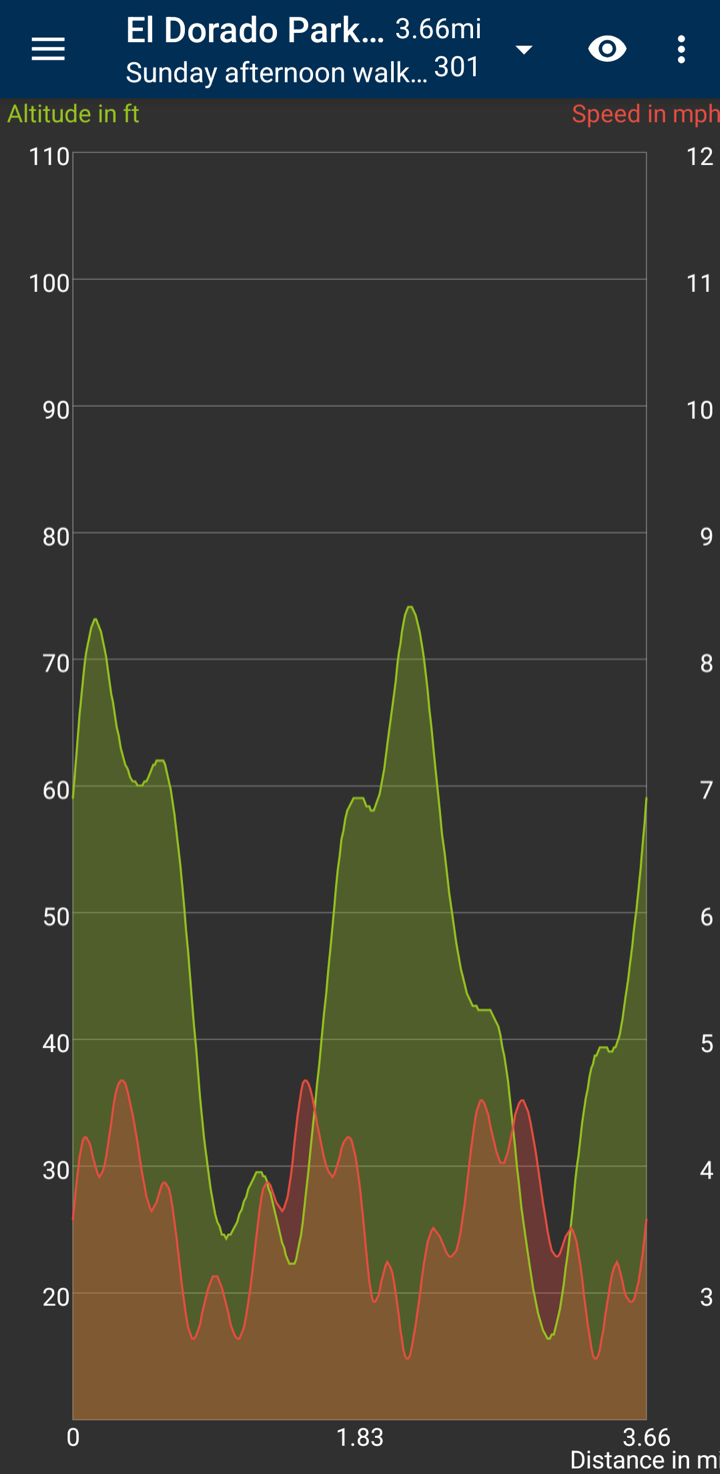
The Chart card shows altitude and speed information about your track. Tap on the chart to open it full screen. You can also select View > Chart in a stream. If the stream has several categories, choose one from the drop-down list in the toolbar.
The green line shows the altitude; its scale is on the left side. The red line shows the speed; its scale is on the right side.
You can switch the horizontal axis between time and distance using the View command in the menu. Show on Map shows the stream on the map chosen under Default Map Type in Settings, and Export writes the stream to a file.
Categories
You can add new categories to an existing category of a stream.
📱 Add a category
- Open the stream and select a category
- Tap on plus and open the Category tab
- Tap on the type of the new category
- The dialog will close and you are back in the category where you started
📱 Delete a category
- Open the stream and select a category
- Select Clear from the menu
- The category, its descending categories and all their nodes move to the Trash of the stream
- To delete them for good, open the Trash and select Clear again
Sometimes it is useful to change the type of a category. For example, when you imported data from KML, there is no information whether the elements of a folder are just a set of locations or a route. You can change the category type to route so that the stream shows up under All Routes.
📱 Change a category type
- Open the stream and select a category
- Select View > Style from the menu
- Tap on the type and select a new one
- Go back to save your changes
The style editor also changes the name, the description, the line width and color, and the fill color of polygons.
Import
Use the Import tab to read tracks, routes and waypoints from files and links. GPS Essentials reads GPX, KML, KMZ, LOC and MFT (Mapfinity) files.
- In a stream, tap plus and open the Import tab. The data is added to that stream.
- In the stream list, tap plus and open the Import tab. The data goes into a new stream.
- In another app, such as Files, Google Drive or your email app, open the file with GPS Essentials. The data goes into a new stream.
On the Import tab, the browse button picks a file on your device or in a cloud storage app, and the import starts right away. The link button shows a field for a link that starts with http:// or https://, filled with what is on the clipboard; tap send to import it.
The screen shows the progress. Tap Stop to cancel; a cancelled import leaves nothing behind. When the import is done, tap Open to see what was imported. If the import fails, the screen explains why, and nothing is imported. Very long names and descriptions are shortened and end with “[…]”.
Export
Export writes data from GPS Essentials to a file that you can save or send to another app. You can export a whole stream, a selection of elements, a single waypoint, or all elements with a tag. Export is in the menu of a stream, a waypoint, a chart and the style editor, among the actions for selected elements or streams, in the tag list, and in the dial menu of Portable Maps.
Select the format at the top of the screen:
- KML (Google Earth): KML optimized for Google Earth.
- KML (Google Maps): KML optimized for Google Maps.
- GPX 1.0 and GPX 1.1: understood by most GPS devices and apps.
- KMZ: compressed KML.
- LOC 1.0: the LOC waypoint format.
- MFT 1.0: the Mapfinity File Format.
Save As opens Android's “Save as” dialog: you choose the folder and the file name, on your device or in a cloud storage app. Share sends the file to another app, such as Gmail, Google Drive or Dropbox. A large export can take a while; to cancel it, tap the close button next to the progress message.
To send streams quickly, select them in the stream list and choose Share. This skips the export screen and uses the format you chose there last.
Edit Waypoint
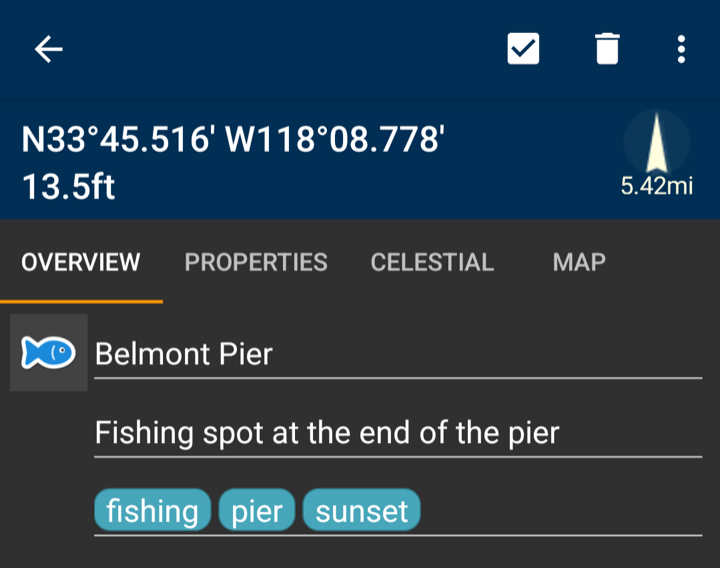
Tap on a waypoint or a picture in the stream list to edit it. The editor has a fixed part at the top that shows the location, the elevation, and the direction and distance to it from your current location. Below the fixed part are the tabs Overview, Properties, Celestial and Map.
- Overview: tap the icon to show all icons, then tap the one you want. Tap and edit the name and the description. Their length is not limited, but only two lines are shown in the list of the stream. Type words into the tags field to add tags (see the Tags chapter).
- Properties lists all stored values, such as the position, altitude, accuracy, speed, time, category and tags, and, where they were recorded, the direction the device pointed in and how it was tilted. For a picture, it also lists the file type and size. The values cannot be changed here.
- Celestial shows today's sunrise, sunset, moonrise and moonset at the location.
- Map shows the location on a small map. Tap it to open the full map there. With Labs on, it uses the new map, otherwise the classic one.
The menu offers Mark, Delete, which deletes the element right away, Show on Map, Export, Set as Target, which starts navigating to it, Geocode, which looks up an address and sets the name and description from it, and Get Elevation, which sets the elevation from the terrain data.
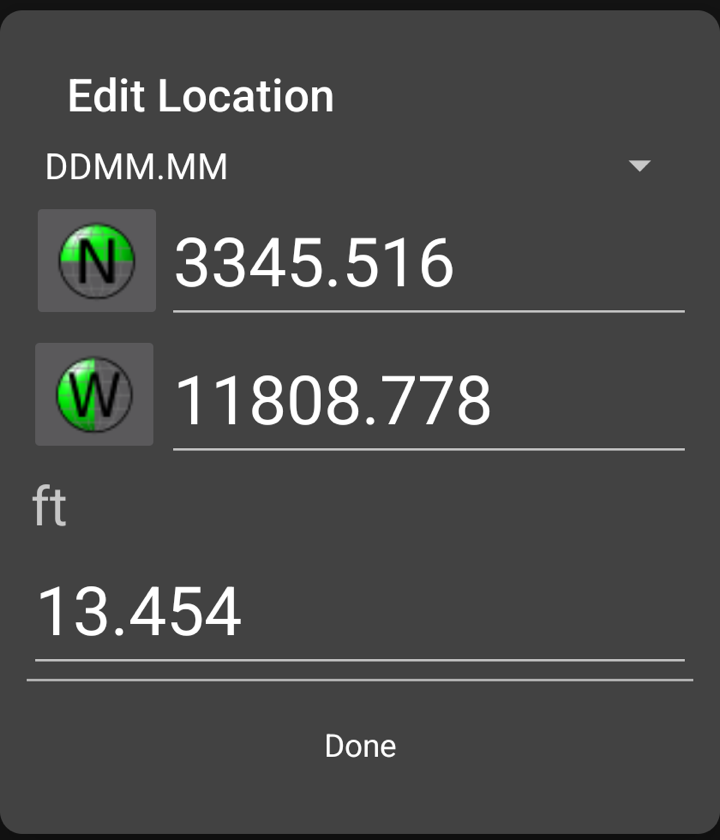
To edit the location of the waypoint, tap on the location on the top of the screen. The location editor consists of a selector for the location format and some edit fields and buttons. When you change the location format, the location will be presented in the new format. Press Done to submit your changes.
When you have entered some numbers into the location editor and then select another format, GPS Essentials attempts to convert the location into the new format.
The following formats are supported:
| Name | Format | Remarks |
|---|---|---|
| Degrees/ |
DDMM.MM, e.g. 17301.04 means 173°1.04’ | Notice decimal point is after the full minutes part |
| Degrees/ |
DDMM.SS, e.g. 5703.12 means 57°3’12” | Notice the decimal point is after the minutes part |
| Decimal | D.D, e.g. 57.9234 means 57.9234° | |
| UTM | Zone/ |
|
| MGRS | Grid Reference e.g. 4QFJ12345678 | |
| OSGB36 | Six Figure Notation, e.g. HU396753 |
For example, to enter a location that Google Earth shows as 47°53'38.54"N 11°43'47.10"E, select DDMM.SS, press the hemisphere buttons until they match and enter 4753.3854 and 1143.4710. The location shown at the top of the editor depends on the Position Format in Settings.
If you want to transfer many waypoints at once, consider exporting them from the other app as a KML or GPX file and importing that file into GPS Essentials.