Camera

Shows your waypoints in the camera picture. You can also take pictures, and each picture stores the location and direction where you took it.
There are two cameras. The classic camera draws a head-up display (HUD) of your waypoints over the picture. With Labs on (Try New Features in Settings), the Camera button opens the Labs camera instead, which draws the map and your data into the picture, each where it lies in the world. The first time you open either one, Android asks for permission to use the camera.
The Classic Camera
The HUD displays waypoints so that you can match them with landmarks. Waypoints within 50 km appear in the picture in their direction. When a waypoint is in the circle in the middle, its name appears in the top left corner, together with the distance and bearing to your target. If a navigation target is set and it is outside the circle, a triangle on the circle points towards it.
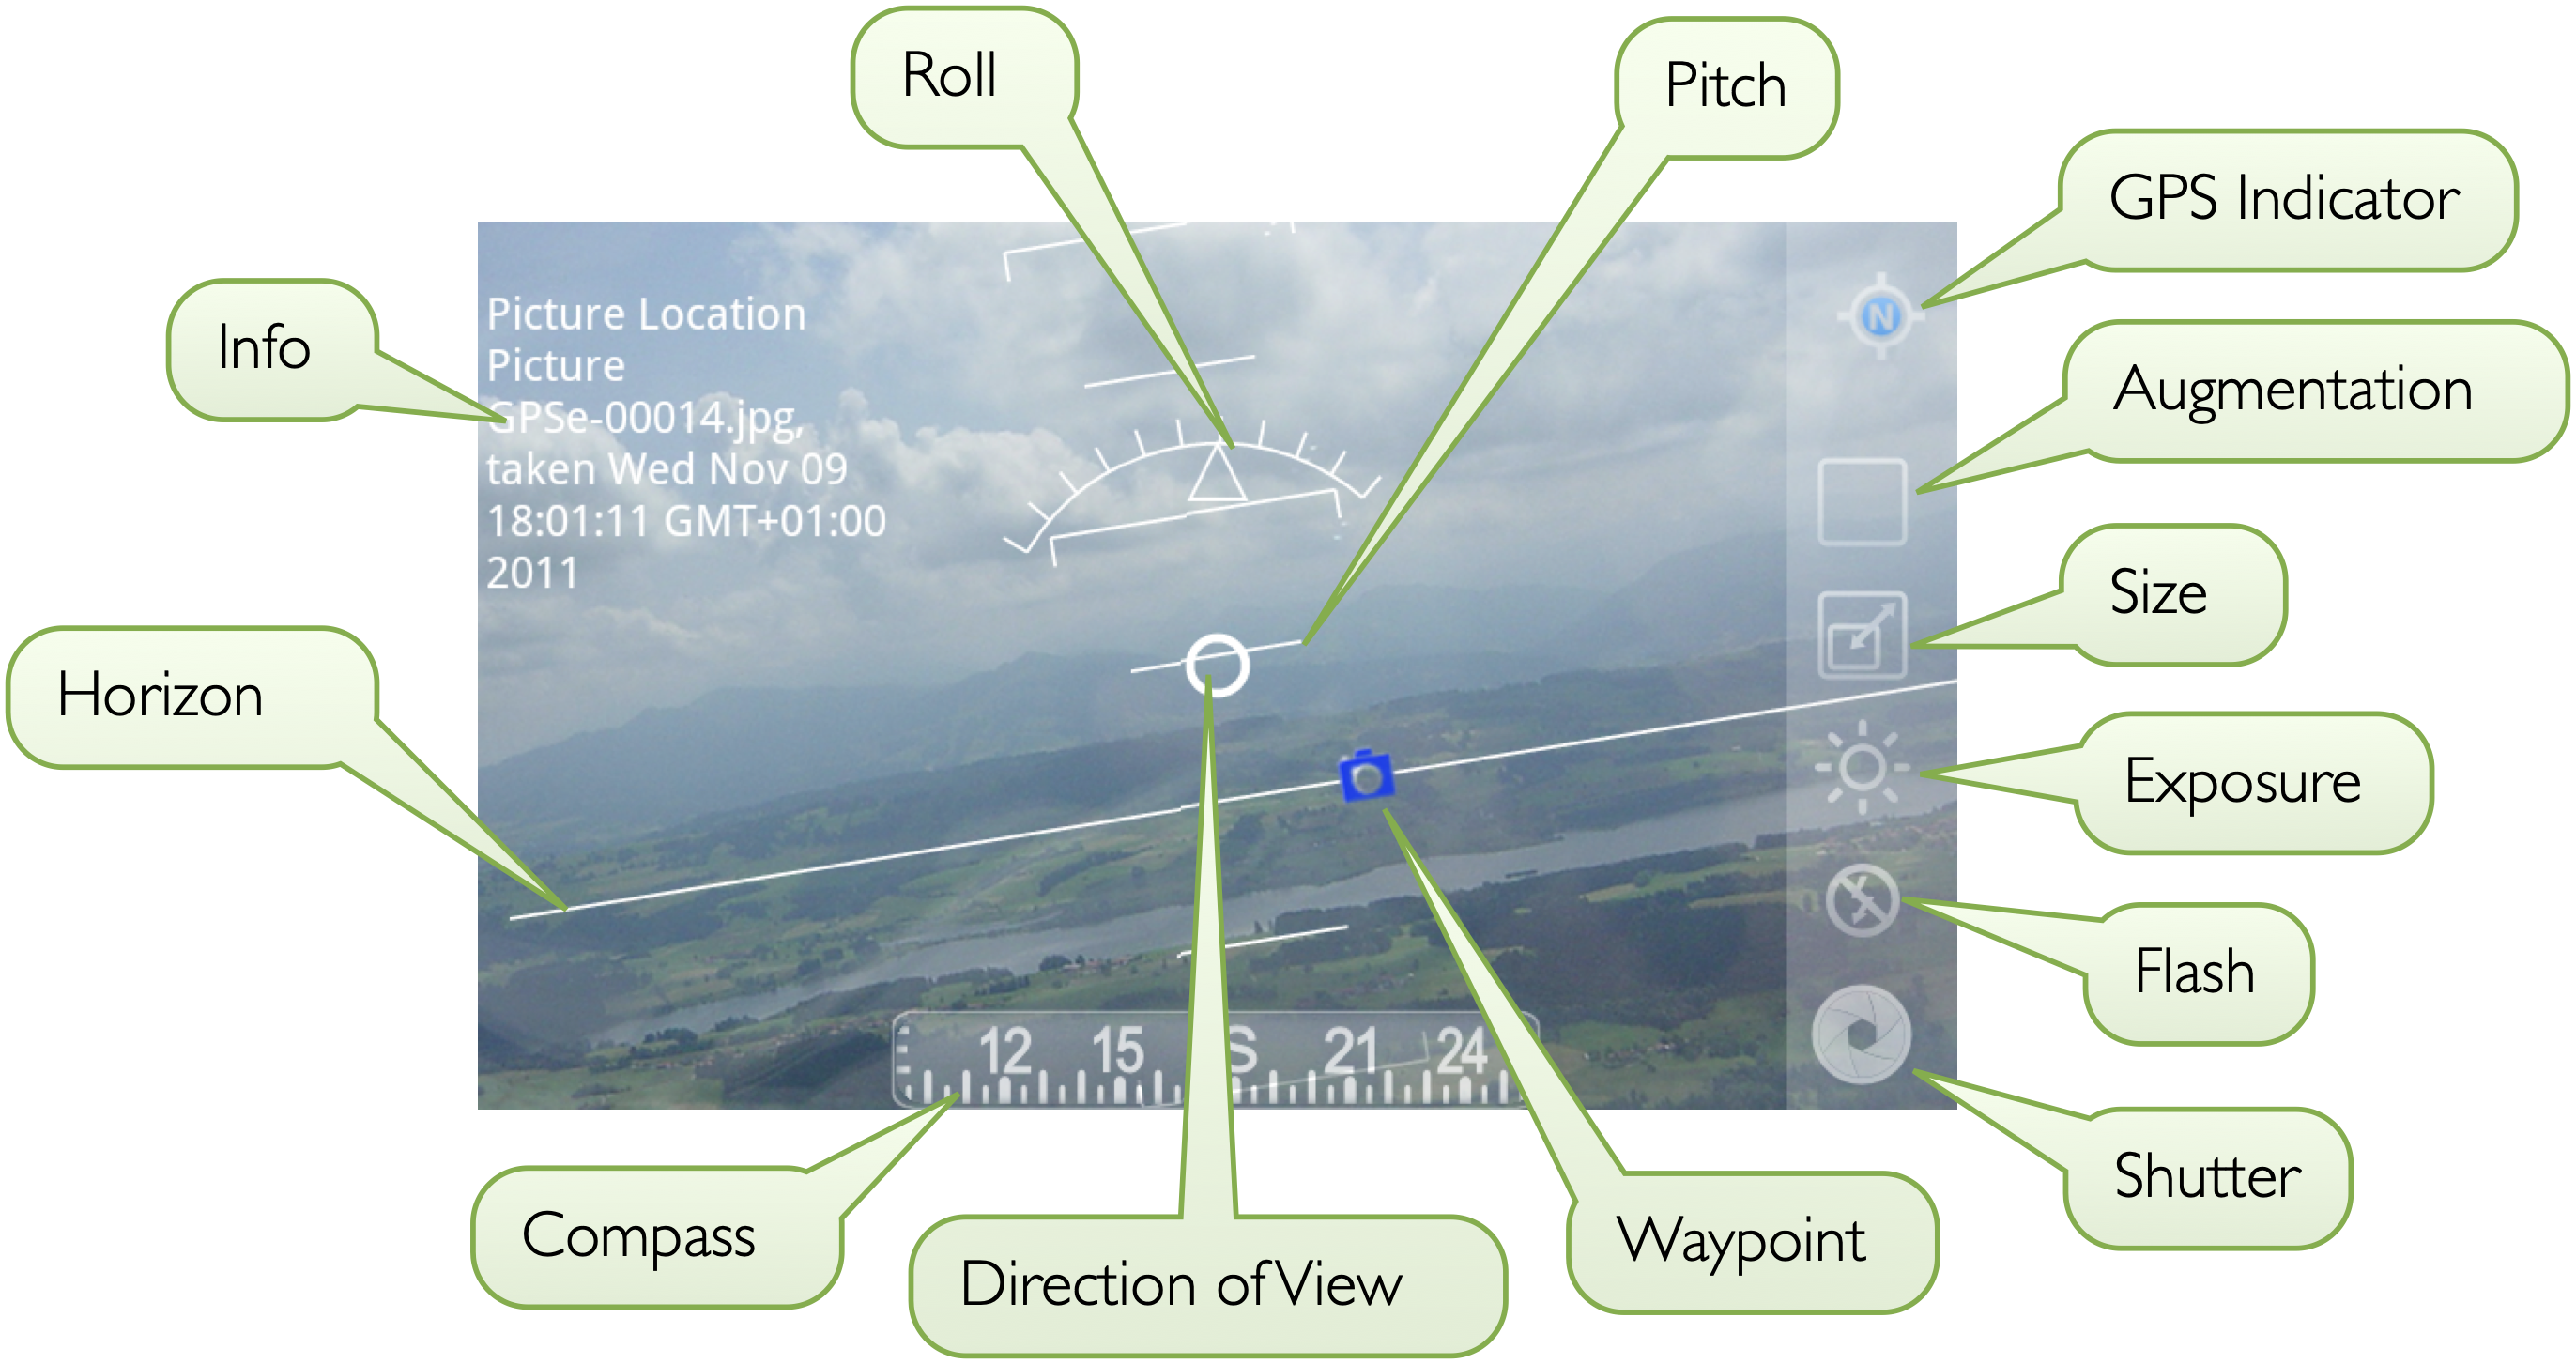
Directional indicators show you how the device is oriented: The compass at the bottom shows the current azimuth angle. A horizontal line marks the horizon, and the stacked lines show the pitch angle in 5° steps. The radial scale shows the roll angle in 5° steps.
The toolbar controls the camera. The GPS indicator at the top tells you where the current location comes from: blue for a network location, green for a GPS location. The location is stored with the picture, so you might want to wait for GPS to get a more accurate location.
The augmentation tool lets you switch between augmented and plain image. When you switch on augmentation, the directional indicators will be rendered onto the saved image.
Once the camera is open, more tools appear, if your camera supports them. The size tool lets you change the size of the image on disk. Large images consume a lot of memory. When augmentation is enabled, you need twice the size of the uncompressed image in RAM. If you receive messages telling you that you ran out of memory, reduce the image size. The exposure tool lets you increase and decrease the exposure. The flash tool lets you change the flash mode.
The shutter button in the lower right corner, or the camera key if your phone has one, takes a single picture. After the picture has been captured and processed, you will see it in the lower left corner. Tap it to view it.
The Labs Camera
The Labs camera shows the camera picture with the map, a head-up display and your data drawn into it. Its controls stand on glass along one short side of the screen and turn in place to stay upright however you hold the phone.
What Lies Over the Picture
Four buttons switch what is drawn over the picture, each on or off. A message such as “Map: on” confirms the change.
- Map: the map, seen through the camera, with buildings standing where they stand.
- HUD: a head-up display, with a heading tape along the top, the horizon and a pitch ladder, and a boresight in the middle with the elevation it looks at.
- Data: your waypoints, tracks and routes. Places hidden behind hills or buildings are drawn dimmed.
- Sky: where the sun and the moon stand.
The badge above them shows where the location comes from: none yet, the network, or GPS.
The Aim Mark
With Data on, corner brackets mark the middle of the view. Aim them at a waypoint and they close in and turn amber; a card below them shows its name, description, distance and bearing. While you navigate to a target and aim at nothing, the card shows the target. When the target lies outside the view, an arrow at the edge of the screen points towards it.
Height Above the Ground
The camera needs to know how high it is to put the map and your data in the right place. It takes the height from GPS and the barometer by itself. On an upper floor or a tower, drag up or down on the picture: a tape shows the height in your altitude unit while you drag, and the map follows your finger. Drag down to place the camera higher.
A height you set is kept until you change it, also the next time you open the camera. Below the ground on the tape is the stop “auto”: drag down past zero to it and let go, and the height comes from GPS and the barometer again. While you hold a height of your own, a dashed mark on the tape shows where auto would put the camera, once GPS knows.
Calibrating the Heading
A phone's compass is often a few degrees off, more so near metal or inside a car. If the map and your data don't line up with the picture, tap Calibrate heading. The card that opens offers three ways, and shows the correction so far:
- Drag the picture sideways until the map lines up with what you see.
- Walk a few steps straight ahead with the camera pointing the way you walk; the camera compares your compass with the way GPS sees you move.
- Select the sun or the moon, whichever is up, and tap Start. Crosshairs appear in the middle and the shutter shows the sun or the moon. Put the real sun or moon in the crosshairs and press the shutter. While you aim at the sun, the picture is darkened and the screen brightened so that you can see it. Cancel goes back to the card.
A message tells by how much the heading was corrected. If the sun or the moon was also drawn too high or too low, it says so too: that is not a compass error but the tilt of the phone, which calibration does not change. Tap Done when you are finished. The correction is kept for this phone.
Taking Pictures
Tap the shutter button in the middle of the toolbar. With Save overlay on, the picture is saved with what lies over it drawn in.
Flash, Exposure and Picture size open a dial beside the toolbar. Turn it by dragging along its rim, or tap a value; the setting's name and value show inside the rim. The dial slides away after a few seconds, when you touch the picture, or when you tap its button again.
Where Pictures Go
Pictures are added to the stream you opened the camera from, or to the Pictures stream. Each picture stores the location and direction where you took it. See the Pictures chapter for how to browse them.
The settings under Saved Image Meta Data in Settings control whether your device ID and location are written into the image files. Anyone you share a picture with can read them.